This dialog contains all the options for inserting hyperlinks in your topics. For detailed instructions see the Links, Anchors, Macros Scripts and HTML chapter. The appearance of the dialog changes depending on the kind of link you are inserting.
The Insert Hyperlink dialog:

Common options for all link types:
Caption / Picture: |
The caption displayed in the text for the link if you are creating a text link. If you select text in the editor before invoking the Insert Link function the selected text is displayed here. If you select Picture in the Style section (see below) Picture: is displayed above this field instead of Caption:. The Using the Automating Publishing Jobs variable: |
Tooltip: |
Adds text for a tooltip that is displayed on mouseover in HTML-based output formats. |

Style:
Link: |
The standard link format: text link, displayed in blue with an underline. |
Text: |
Displays the link as plain text that you must format yourself in the editor. If you don't format the link it will be active but it will not look any different from the text around it, i.e. it will not be identifiable as a link. |
Button: |
Displays the link as a standard Windows button. The caption in the Caption: field is used as the label text on the button. |
Picture: |
Uses a graphic as the link instead of a text caption. The supported graphics types are indicated by file extensions are displayed in the dialog displayed when you click on the |

Help file: |
The file containing the topic you want to link to. By default this is the current project file but you can also create links to other project files and compiled HTML Help CHM files. Click on the The target help file must be present in the same directory as the file containing the link at runtime (i.e. on the user's computer). Also, the target help file must have the same format as the help file containing the link. You cannot create links between help files of different types, only between two CHM files. |
Window: |
Only relevant in HTML Help. If you have defined secondary window types for your project you can select a different help window type for opening the target topic. In HTML Help selecting a secondary help window here only opens an external window if secondary HTML Help windows are activated in the Help Windows configuration. If they are not activated this setting has no effect in HTML Help. Topics in HTML Help do not change their background colors when you specify a secondary help window in a hyperlink. Their colors are defined by the HTML template of their own window type definition and this cannot be changed by a link. Even when they are displayed in an external window the secondary window type only controls the appearance of the window, not of the topic itself. |
Target: |
The topic ID of the topic you want to link to. Select the ID from the list or type its name in the entry field. Each letter you type will automatically display the first topic matching that letter. |
Anchor: |
Use to link to an anchor inside the selected topic, so that clicking on the link takes the user directly to the position of the anchor. Anchors are only displayed here if the target topic already contains anchors. If you have just inserted an anchor in the target topic it is not displayed until you save your project. |
Topic preview: |
Preview of the target topic |

Address: |
The website URL or email address you want to link to. Always enter a complete URL for websites, including the http:// protocol prefix. Links without this prefix sometimes don't work in HTML Help. |
||
Test |
Test the URL. Opens your browser or email program. |
||
Links to an Internet address: |
Select to enter a website URL. |
||
Sends an email: |
Select to enter an email address. |
||
Target window: |
Same as referring topic
New window: Top frame: |
Figure link dialog options:
Figure links are special topic links that use the ID of a figure, table or caption variable as their target. You choose the topic containing the figure, then choose the figure ID from a drop-down list. This functions in exactly the same way as a link to an anchor in a topic.
See Figure and Table Counters for details on how to use these variables and create figure IDs.
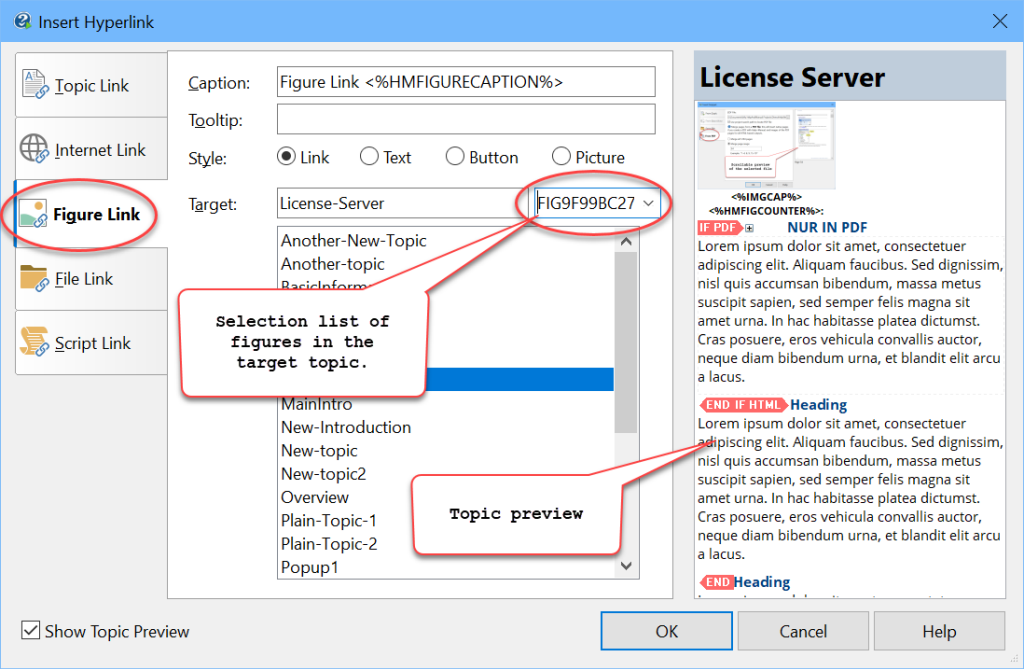
Target: |
The topic containing the figure you want to link to. This is exactly the same as a regular topic link. It must be in the current project. |
Figure ID: |
Select this from the drop-down list next to the target field. There will only be entries in the list if there are figure IDs in the target topic. This works in exactly the same way as a link to an anchor in a topic. |
File link dialog options:
File links link to external files located in the same directory as the help file containing the link. When the user selects the link it is like double-clicking on a file in the Windows Explorer.
See Inserting file links for details and compatibility with various output formats.

File name: |
The name of the file you want to link to. You can use the If you enter the file name manually always type the complete name of the file, including the extension. |
Relative path: |
A relative path to the file. This path will be inserted before the file name in the actual link. It should be the path that is valid when the help is viewed by the user, NOT a path on your computer! |
Execution parameters: |
Any parameters you want to add to the file link, for example switches or a file name to follow an executable program. |
Test |
Tests the file link with the execution parameters. If you use the Note that this doesn't test whether the file link is compatible with your output format! It only tests how executing the external file behaves with the execution parameters entered. |
Script link dialog options:
This option enters a link that executes a Winhelp macro or some JavaScript code. Please see Inserting script and macro links for information on how to use this function.
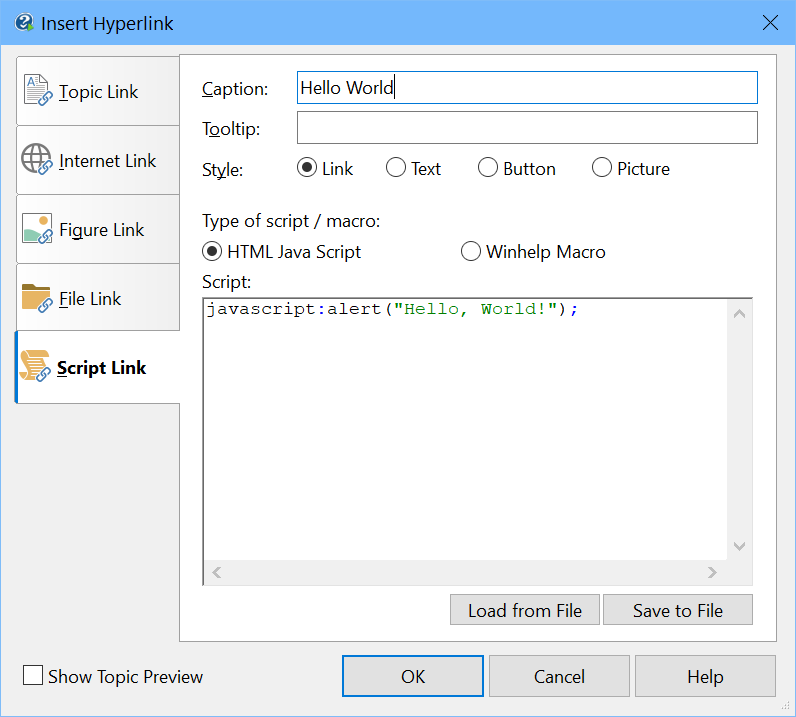
HTML JavaScript: |
Select this to enter JavaScript code. Only supported in HTML Help and WebHelp output. |
Winhelp macro: |
Select to enter a Winhelp macro. Although the obsolete Winhelp output is no longer supported, four special Winhelp macros are automatically converted to their ActiveX equivalents in HTML Help. See Inserting script and macro links for details. |
Script: |
Enter your script or Winhelp macro here. |
Note on script links: Script links are generated as follows: <a href=" contents of Script window "> If you are familiar with web scripting you can use this information to enter complex scripts. (See the links under See also: below for full details on this.) |
|
Load from File: |
These buttons allow you to save and load blocks of script and macro code that you want to reuse. Load from file.. loads a text file to the current cursor position in the script window. |
See also:
Inserting script and macro links
Scripts, HTML and Macros (Reference)