|
Navigation: Basic Working Procedures > Text Formatting and Styles > Numbered and Bulleted Lists Outline numbered lists |
Scroll Prev Top Next More |
If you activate standard UL/OL lists for HTML output list bullet definitions are ignored. When standard HTML lists are enabled only the default browser bullets are used. |
Outline numbered lists, or multi-level lists, are pretty much the same as normal numbered lists except that they also support multiple numbering levels and each level can have a different style. This is much easier to demonstrate than to describe:

1.This is the first level of an outline numbered list. a.The is the second level of the list. b.This is another second-level list entry. 2.This is another first-level entry in an outline numbered list. a.This is a second-level entry. In this list second-level entries are numbered with a, b, c... b.This is another second-level entry. i)And this is a third-level entry. In this list third-level entries are numbered with i, ii, iii... ii)This is another third-level entry. You get the general idea... |

1.Click in a paragraph or select the paragraphs you want to turn into a list. Then select the bullets and numbering tool in Write > Paragraph. Display the quick gallery, then select Bullets and Numbering to display the bullets and numbering formatting dialog.  2.Select the Outline Numbered tab and choose the outline list template you want to apply.  3.Click on OK to create the list. All the items in the list will initially be top-level items. See below for instructions on creating lower-level items. Tip – turning single-level lists into outline lists:
|


1.Click in the list entry you want to make a lower-level item. 2.Use the Indent Tools in Write > Paragraph to increase or decrease the level of the current item. (When you are not in a list these tools change the normal paragraph indents.)
List indent:The list indent is set automatically. To change it you must change the indent of the first paragraph in the list. See Formatting lists for details. Note also that in multi-level lists you only have one indent that applies for all items in the list, no matter what level they are on. |
Note 1 – Resetting in the middle of a list: Note 2 – Resetting in the gallery only works on top-level items: 1.Select the part of the list you want to renumber. This will normally be the entire list, but you can also restart at any point in the list. 2.Select the bullets and numbering tool in Write > Paragraph. Display the quick gallery, then select Bullets and Numbering to display the bullets and numbering formatting dialog. 3.Select the Outline Numbered tab. This is important! If you try to reset numbering of an outline list in the normal Numbered tab you will get incorrect results! then select Restart Numbering to reset the list numbering to start at 1 or Start at: to select the number you want to start with: |
See Formatting lists for more details on individual list formatting options. It is important to understand that the list templates just define the list bullets or numbering and the levels for outline numbered lists. They are not styles and they do not define the paragraph attributes of the list items, with the exception of the indent. 1.Click in the list entry (for a single entry) or select the entire list. (It does not actually make much sense to change the appearance for a single list entry...) 2.Select Write > Bullets and Numbering. to open the Bullets and Numbering dialog and select the Outline Numbered tab: 3.Select one of the predefined outline numbered lists from the Gallery and click on OK. OR select one of the definitions and click on Customize to modify the definition. Important: Don't use the last list template for customization you want to store.  The Reset button resets the list definition for the selected style slot. It is only active if the selected slot definition has been customized. |
See Formatting lists for more details on individual list formatting options. It is important to understand that the list templates just define the list bullets or numbering and the levels for outline numbered lists. They are not styles and they do not define the paragraph attributes of the list items, with the exception of the indent. 1.Select a list template in the Outline Numbered tab (see above). You can select any of the predefined "slots" for customization except the last one at the bottom right. That one is reserved for temporary customization and will be overwritten the next time temporary customization is performed. See Temporary list customization for details.  2.Then click on Customize to modify the definition. You will see this dialog: 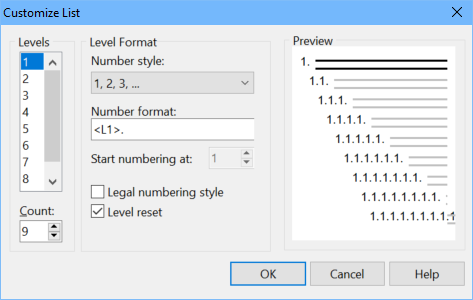 3.Edit the list definitions for each level of your list that you want to change by selecting the level number in the Levels box on the left. The results for each level are displayed in the Preview box on the right. Note that there is a separate definition for each level of your outline numbered list! You must edit all the values for every list level that you want to change. 4.Click on OK to save your new outline numbered list definition to the Gallery. This will overwrite the current definition. Use the RESET button to restore a list template slotTo return a list template slot to the default settings, just select it and click on the Reset button in the Outline Numbered tab. Number style:You can choose a different numbering style for each level. Select the level from the list on the left, then select the numbering style. The selected style will be displayed automatically in the preview on the right. Number format:This field allows you to enter characters to be displayed to the left and the right of the number for each level. •<L1>, <L2>, <L3> and so on are the variables that enter the numbers in the list for each level. Don't change or delete these entries! Also note that the number of each variable must correspond to the level number. For example, <L1> is for level 1, <L6> for level 6, and so on. •For each level, enter the characters you want to display with the list number to the left and right of the <Lx> variable. Examples: (<L1>) will generate: (1), (2), (3) Start numbering at:This setting allows you to set the number at which numbering is to begin for the current level. The setting is stored separately for each level and must be set for each level. Legal numbering style:Activates legal numbering style for outline numbered lists, with all the list numbers at the left margin. Must be set separately for each level of an outline numbered list! 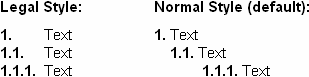 •You cannot have different indent sizes for individual levels in outline numbered lists. Because of this the legal numbering style is preferable for lists with large numbers of levels otherwise you would have a very large indent for the top level and smaller indents for the lower levels, which does not look so harmonious. Level reset:When this is selected the numbering of sub-levels in outline numbered lists always re-starts with 1 or the equivalent. Otherwise the numbering continues from one sub-level to the next. Must be selected separately for each level of the outline numbered list!  Changing the number of levels:By default outline numbered lists have 9 levels. You can increase or decrease this number with the Count: setting. The maximum number of levels is 20. Even 9 is actually far too many – lists should never have more than four or five levels at the maximum, otherwise they tend to be confusing for the reader. |
If you customize a list, apply it to the list you are working on and then edit the list everything will be normal. You can add new levels to the list in the topic editor window and each new level you add to the list will have the style you defined in the customization dialog. This is because in the background, the list temporarily already has all the levels you defined in the dialog. However, this is only valid for your current session. That leads us to this problem: Customized list templates don't work when I return to them the next day! Whoops! You spent time customizing a list template and stored it in one of the available slots in the list dialog. Then you closed your project, returned to it the next day and added some new levels to the list – and they had the wrong formatting! Instead of your definitions in the list template, they seem to have random formatting! What gives??? The full list template is only stored with the list for the current session Since list templates in Help+Manual aren't (yet) dynamic, there is no link between the style and the list as there is for paragraph styles. However, when you apply a style to a list, the list temporarily stores the formatting for all the levels in the background. If you add levels to the list, it formats them correctly because it already "knows" how all the levels are supposed to look. This background information is lost when you save and move to a different topic or close the project, however. When you return and add new levels, Help+Manual will then "guess" what the new levels are supposed to look like, and that is rarely what you defined in the list template. How to use a stored customized list template in the next editing sessionTo do this you need to re-activate the background information for the whole list. You do this by re-applying your stored list template. 1.Select or click in the list you want to work on in the editor. 2.Click on the arrow on the right of the Numbered List tool in the Toolbar and then select Bullets and Numbering at the bottom of the dialog displayed to open the list gallery. The list template belonging to the list will be selected if Help+Manual recognizes it.
3.If it's not selected, just select the slot where you stored your list definition. Caution: Temporary List Customization: If you click on the Customize button when no list template is selected you start a temporary list customization. This will then automatically be stored in the last template (bottom right). You can use this just like the other templates, but it will be overwritten the next time you start a temporary customization. So it's better not to use this for templates you want to reuse. See Temporary list customization for details. 4.If you want to customize the list before applying it click on Customize after selecting the template. See Customizing outline numbered list definitions above for details. Otherwise, just click on OK to apply it to your list. It will then have all the information it needs in the background for all levels for the current editing session. After this, the list will have all the information from the list template for the current editing session. If you add new levels to the list, or have added them prior to reselecting the template, they will be formatted as they are defined in the list template. |
See also: