The Slides and Objects lists shown to the left of the editing Window in HelpXplain show all the elements in your HelpXplain project.
Slides list

This shows all the slides in your Xplain. Selecting an item in the list selects the corresponding slide in the editing window.
Click on Slides Overview |
Zooms out so that all slides are visible in the editor window. Slide objects can be selected with a single click and manipulated (resize, rotate, move). A double-click on a slide switches to slide view for that slide. Then you can edit the slide contents but not the slide object. |
Click on a slide |
Selects the corresponding slide in the editor. The slide fills the editor window. Its contents can be edited but not the slide object. For that you need to select Slides Overview and then click on the slide you want to change. |
Drag & drop |
Changes the order of the slides. |
Rename a slide |
Select the slide name in the list and press F2. Note that the name of a slide does not affect its sort order. The slide number is only displayed in the name if you do not enter your own name. After you edit it, the display number will no longer be changed. |
Right-click context menu |
Includes options for deleting, duplicating, cutting, copying and pasting slides and moving them up and down in the list to change their play order. You can also export slides as static images in a variety of formats. Note that only the parts of the slide inside the slide object are exported. Anything extending over the borders of the slide object will be clipped. |
Applying settings to multiple or all slides
You can apply settings to all slides by selecting the Slides Overview in the Slides list on the left.
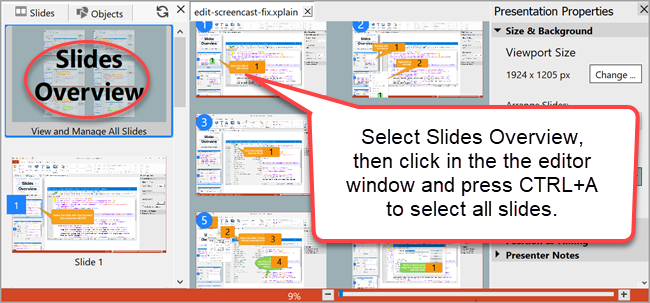
1.Select Slides Overview at the top of the Slides list on the left.
2.Click in the canvas editing area where the slides are shown.
3.Press CTRL+A to select all slides or use SHIFT+Click to select multiple slides one after another.
4.Choose the settings you want to change in the Properties pane on the right.
Objects list

This shows all the individual elements in your Xplain. Selecting an item in the list selects the corresponding element in the editing window. You can reverse the sort order of the list by clicking in the Object heading. The sort order is determined by the internal number of the slide, which is determined by the slide's physical position in the list. If you move a slide in the list, its internal number also changes.
Relationships between elements
The Objects list also shows the relationships between the elements in your Xplain. For example, if you have added an element to a slide by selecting the slide before inserting the element it will be shown as a child of the slide in the list. The same applies for elements inserted into other elements. In this example, Text5 is a child of Shape1:

Hiding, locking and clipping elements:

The three columns to the right of the object names allow you to hide and lock anything listed in the object list and also activate clipping.
Hiding elements makes it possible to edit other elements beneath the hidden element without moving anything.
Locking elements makes the element uneditable to protect it. Elements can be both hidden and locked at the same time if necessary.
Clipping elements makes anything inside the element that protrudes beyond its boundaries invisible.
Visibility column |
Hides or shows the selected element. Hiding elements allows you to edit elements that they cover without needing to move the upper elements. |
Lock column |
Locks the selected element(s) to prevent accidental editing. Locked elements cannot be selected, moved or edited. Locking is also available with the Lock tool in the Home tab. |
Clipping column |
Clips the children of the selected element. Elements inside the element that protrude over the edges of the element are clipped so that only the parts inside the parent are visible. |
Mouse actions in the Objects list:
Click |
Selects the corresponding element in the editor. |
Double-click |
Selects the corresponding element and zooms and rotates it to fill the editor for editing. |
SHIFT + click |
Select multiple elements via the Objects list. This can be very useful with objects that are difficult to select directly with the mouse. |
Right-click context menu |
This provides quick access to Delete, Rename, Hide, Lock and Arrange for the selected object(s). There are also options for refreshing the object list and making all objects visible. |