|
Navigation: Basic Working Procedures > Links, Anchors, Macros, Scripts and HTML Anchors - jump targets |
Scroll Prev Top Next More |
Normally, topic links execute jumps to the top of the target topic. However, often you will also want to create jumps to some point inside a topic. This is done with "anchors" (sometimes also referred to as "bookmarks" in books on help). Anchors are named "jump targets" that you insert at any position within a topic so that you can jump to them with a link.
Anchors in Help+Manual do not have captions. They are identified by an anchor icon in the editor. |

1.Click in the text at the point where you want to insert the anchor (i.e. the position you want to be able to jump to with your links). 2.If you select text the selected text will be copied and used as the anchor ID. 3.Open the Insert Anchor dialog box. There are two ways to do this: •Press Ctrl+H OR •Select the Type in a descriptive ID for the anchor in the Anchor ID: field. This will be displayed in the link dialog when you are creating links so it should be easy to identify. You cannot use spaces or special characters. 4.If you want to use a help context number you can type it in manually (this allows you to make calls to anchors from applications). You can also set Help+Manual to assign help context numbers to anchors automatically in Configuration > Common Properties > Miscellaneous. 5.Type in any keywords you want to associate with the anchor (see below for details). Like topic IDs, anchor IDs can be up to 255 characters long. However, since you need to view anchor IDs in dialog boxes it is advisable to keep them relatively short. |
 anchor tool in
 1.First create a normal topic link to the topic containing the anchor. 2.Open the Edit Hyperlink dialog box. Just double-click on the link to open the dialog if it is not already open. 3.Select the anchor ID from the drop-down list to the right of the Target: field and click on OK. 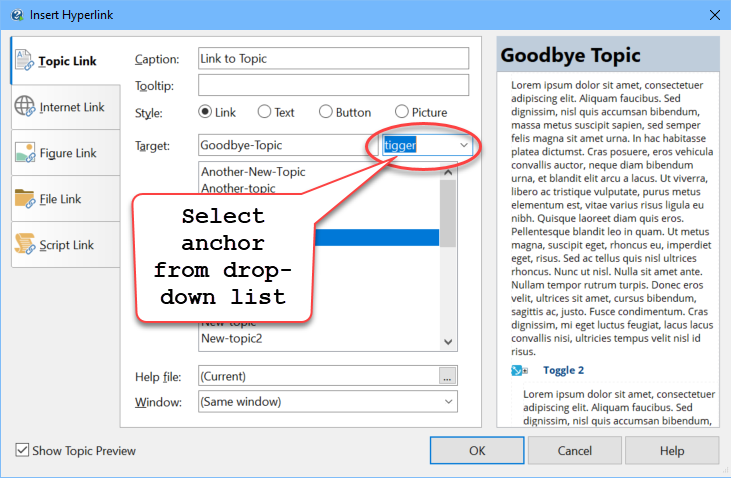 To quickly create a link to an anchor in the current or another topic just create the link with Drag & Drop and then double-click on the link to select the target anchor in the dialog. |
Linking to an anchor in the current topic is simple once you get your head around the concept: Basically, you first need to create a normal topic link to the current topic, in the same way you would if you were linking to a different topic. Then you edit the link and select the anchor. 1.Create a normal topic link to the current topic. 2.Double-click on the link to open its edit dialog. 3.Select the anchor you want to link to in the anchor drop-down list directly next to the Target: field. |
You can also link to images, tables and caption objects for figure and table counters, provided they have IDs. Then they are displayed in the anchors drop-down list next to the Target: field in the same way as regular anchors. |
You can also create additional TOC entries pointing to the current topic that are linked to an anchor in the topic. Then selecting the TOC entry in the published documentation will take the user to that anchor in the topic. This can be useful to create a "fake chapter" consisting of a single topic. The sub-topics then point to the anchors inserted at the headings for those parts of the topic. 1.Create headings in your topic for the sections and insert anchors at the beginning of each heading or in the paragraph directly above the heading (that leaves an attractive space at the top when the page scrolls to the anchor). 2.Make a note of the Topic ID of the topic, which you can find in the Topic Options tab on the left of the main editor window. 3.Click in the TOC in the position where you want to enter the new TOC item, then select any of the options for creating a new topic. 4.When the Insert Topic dialog is displayed select TOC Link on the left. Then select Link to topic in this project.  5.Enter a title for the new TOC link in Heading in Table of Contents:, then select the ID of the topic you want to link to from the Target Topic: list. 6.Select the anchor you want the new TOC item to point to in the Topic Anchor list at the bottom of the dialog. 7.Click on OK to create the new TOC link. |
When you create a hyperlink to a topic containing a linked snippet, any anchors stored in the snippet will not be displayed the drop-down anchor list next to the Target: field. (This does not apply for snippets inserted in Copy mode, of course, which become part of the current topic like normal pasted text.) 1.To link to an anchor in a linked snipped first view the source topic or snippet file and make a note of the anchor IDs you want to link to. 2.Then create the link and type the ID of the anchor you want to link to manually in the drop-down list box next to the Target: field. |
You can also create URL links from your application or from other web pages to anchors in WebHelp pages so that users are taken directly to a specific point in a topic when they use your links. The syntax is exactly the same as the standard HTML syntax for URLs containing anchor references: index.html?topicname.htm#anchorname The topic name is simply the Topic ID of the topic, plus the extension .htm. The entire URL must be written in lower case because Help+Manual automatically converts all file names to lower case in HTML output for compatibility with Unix and Linux servers. See Context calls to WebHelp for some more details on this. |
You can also associate index keywords with anchors. Selecting these keywords in the help index will then jump to the anchor instead of the top of the topic. See Keywords and Indexes more information on using keywords and Using keywords with anchors for more information on using keywords in combination with anchors. •Type the keywords into the Keywords: field of the Insert Anchor dialog. You can enter both main keywords and sub-keywords. Use the TAB key to enter sub-keywords (an indented keyword automatically becomes the sub-keyword of the keyword above it). •Typing a space or tab in front of a keyword automatically makes it a sub-keyword of the entry directly above it. Only one level of sub-keywords is allowed. It is possible to have the same keywords in both the topic's keyword list and in one or more anchors in the same topic. However, if you want your index entries to enable jumps to the anchor without confusing the user it is better to avoid this. |
You can edit an anchor and its ID by double-clicking on it. However, it is better not to change anchor IDs after creating them. Unlike topic IDs, links to anchor IDs are not updated if you edit them. This means that editing an anchor ID can create dead links and links to "dead" anchors are not highlighted. The link to the page will still work, of course, but the jump to the anchor will not. How to locate and correct dead anchor linksDead anchor links are not listed in your project reports. However, you can locate them by publishing to any HTML-based output format (HTML Help, WebHelp, eBooks, Visual Studio Help). The compiler report will list all topics containing links to undefined anchors with links to the topics so that you can edit them and correct the anchor reference. Tip: If you have the Professional edition of Help+Manual the easiest way to locate an anchor is to search for the anchor ID in the XML Source Code tab. You can then either edit it directly there or switch back to the editor tab and edit it there. |
See also: